Simple Ray Tracing in Rust 3: Ray Intersections
In the previous parts, we built some of the data structures we needed for
our Rust ray tracer, as well as a parser that can convert a simple .obj
file into a vector of Triangle structs for our calculations. Now we can
get into the thick of ray tracing with our Triangles!
Setting The Scene
Recall in our main function, we’ve just extracted a Vec<Triangle> named
triangles from a .obj input:
fn main() {
    // arg processing...

    let triangles = if let Ok(lines) = read_lines(input_path) {
        // NEW
        parse_input(lines)
    } else {
        panic!("Failed to parse path. Did you enter a valid filename?");
    };

    // ...
}
We can use a constructor function to create our Scene struct from
triangles, like so:
// definition of `Scene` for convenience
struct Scene {
    camera: Camera,
    triangles: Vec<Triangle>,
}

// new...
impl Scene {
    fn new(triangles: Vec<Triangle>) -> Scene {
        Scene {
            camera: Camera::new(),
            triangles,
        }
    }
}
Of course, we also need to define a default Camera to initialize.
We’ll bundle it with a bunch of constants for producing the image
we want.
// camera is angled slightly downwards
// and located slightly away from the origin
const CAMERA_PITCH: Radian = Radian(-0.25);
const CAMERA_YAW: Radian = Radian(0.01);
const CAMERA_POSITION: Vector = Vector::new(0.1, 4.0, -10.0);

// The larger the scale, the higher the image resolution...
// At a scale of 1, we will get a 200x200 image.
const CAMERA_RES_SCALE: usize = 1;
const CAMERA_PIXEL_SIZE: f64 = 0.005 / CAMERA_RES_SCALE as f64;
const CAMERA_VERTICAL_RESOLUTION: usize = 200 * CAMERA_RES_SCALE;
const CAMERA_HORIZONTAL_RESOLUTION: usize = 200 * CAMERA_RES_SCALE;


// definition for convenience
struct Camera {
    pos: Vector,
    pitch: Radian,
    yaw: Radian,
    view_plane: ViewPlane,
}

impl Camera {
    /// Default camera.
    fn new() -> Camera {
        let pos = CAMERA_POSITION;
        let pitch = CAMERA_PITCH;
        let yaw = CAMERA_YAW;
        let view_plane = ViewPlane {
            pixel_size: CAMERA_PIXEL_SIZE,
            res_height: CAMERA_VERTICAL_RESOLUTION,
            res_width: CAMERA_HORIZONTAL_RESOLUTION,
        };

        Camera { pos, pitch, yaw, view_plane }
    }
}
We update main to initialize our Scene.
fn main() {
    // arg processing and triangles...

    let scene = Scene::new(triangles);

    // ...
}
Ray Tracing, At Last
Pretty Colors!
We’ll package a pixel into a neat little Color struct.
As is standard in computer graphics, we will represent
colors in RGB, with red/green/blue values from 0 to 255.
Naturally, this fits into an 8-bit unsigned integer,
so we will define Color as such:
struct Color {
    r: u8,
    g: u8,
    b: u8,
}

impl Color {
    const fn new(r: u8, g: u8, b: u8) -> Color {
        Color { r, g, b }
    }
}
Here, a value of 0 red, 0 green, and 0 blue represents black, while 255 red, 255 green, and 255 blue represents white. 255 red, 0 green, and 0 blue would represent a perfectly red pixel.
High School Geometry
We can easily use our Vector structs to represent our rays, with
the camera’s origin serving as an implicit origin for each ray.
However, we first need to use some trusty trigonometry
so that we can rotate these vectors about in 3D space.
Here are some useful vector operations that we can implement right now:
impl Vector {
    /// Calculate the cross product vector
    #[inline]
    fn cross_product(&self, other: Self) -> Self {
        Vector {
            dx: self.dy * other.dz - self.dz * other.dy,
            dy: self.dz * other.dx - self.dx * other.dz,
            dz: self.dx * other.dy - self.dy * other.dx,
        }
    }

    /// Calculate the dot product scalar.
    #[inline]
    fn dot_product(&self, other: Self) -> f64 {
        self.dx * other.dx +
        self.dy * other.dy +
        self.dz * other.dz
    }

    /// Pitch the vector by r radians.
    #[inline]
    fn pitch(&self, r: Radian) -> Vector {
        Vector {
            dx: self.dx,
            dy: self.dy * r.cos() - self.dz * r.sin(),
            dz: self.dy * r.sin() - self.dz * r.cos(),
        }
    }

    /// Yaw the vector by r radians.
    #[inline]
    fn yaw(&self, r: Radian) -> Vector {
        Vector {
            dx: self.dx * r.cos() + self.dz * r.sin(),
            dy: self.dy,
            dz: -self.dx * r.sin() - self.dz * r.cos(),
        }
    }

    /// Scale the vector by some scalar value n.
    #[inline]
    fn scale(&self, n: f64) -> Vector {
        Vector {
            dx: n * self.dx,
            dy: n * self.dy,
            dz: n * self.dz,
        }
    }

    #[inline]
    fn squared_magnitude(&self) -> f64 {
        self.dx.powi(2) + self.dy.powi(2) + self.dz.powi(2)
    }

    #[inline]
    fn magnitude(&self) -> f64 {
        self.squared_magnitude().sqrt()
    }

    #[inline]
    fn normalized(&self) -> Vector {
        let m = self.magnitude();
        Vector {
            dx: self.dx / m,
            dy: self.dy / m,
            dz: self.dz / m,
        }
    }
}
Ray Projection
We will implement a method on Scene called iterate_over_rays
that will trace our rays (finally!)
and return a list of Colored pixels to render in our output image.
impl Scene {
    fn new(triangles: Vec<Triangle>) -> Scene { /*...*/ }

    // new...
    fn iterate_over_rays(&self) -> Vec<Color> {
        //...
    }
}
First we define some useful aliases (these will be optimized away by the compiler, so no worries about efficiency):
fn iterate_over_rays(&self) -> Vec<Color> {
    let cam = &self.camera;
    let vp = &cam.view_plane;
    let res_height = vp.res_height as isize;
    let res_width = vp.res_width as isize;

    // ...
}
A natural way to iterate over our pixels is by using a for loop. Recall the algorithm we are attempting to implement:
- Draw a light ray from the
Camerathrough each pixel-corresponding region of ourViewPlane - For every surface (
Triangle), determine if it intersects our ray- At the closest intersection between this ray and a surface, calculate the brightness of said surface
- Brightness grows with how perpendicular the surface is to light source
- Repeat for every pixel
In Rust, a corresponding for loop might look like:
fn iterate_over_rays(&self) -> Vec<Color> {
    // useful variables...

    let mut pixel_colors = Vec::with_capacity(res_height*res_width);

    for i in 0..res_width {
        for j in 0..res_height {
            // ...
        }
    }

    // ...
}
Our goal is to project rays out from the camera origin through specific points on the view plane. This is best illustrated with a diagram:
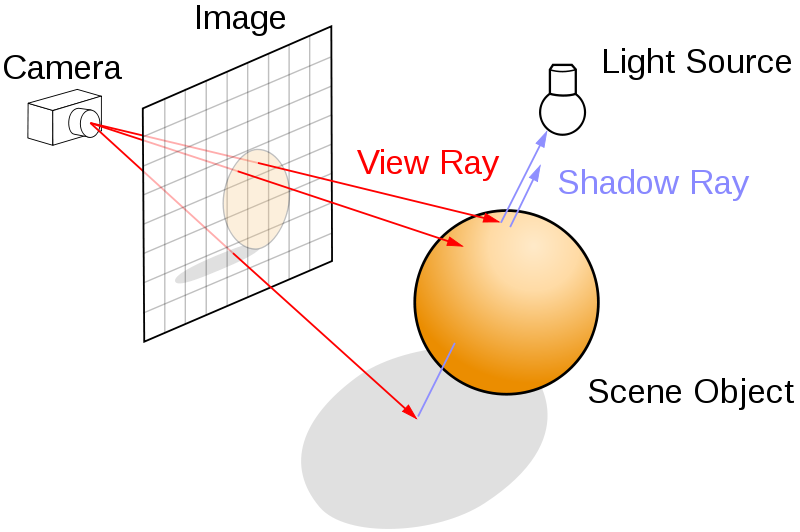 |
| Rays projected out from a camera onto a view plane. Source. |
We can approximate this by defining an x/y pixel offset from the camera origin, and then rotating the resulting ray by the camera’s direction. (Note that this method is not wholly accurate and leads to camera distortion with highly angled camera views; a perfect rendering would rely on a transformation of the view plane).
fn iterate_over_rays(&self) -> Vec<Color> {
    // define useful variables

    let mut pixel_colors = Vec::with_capacity(res_height*res_width);

    // Get index of center pixel
    let i_center = ((res_width - 1) / 2) as isize;
    let j_center = ((res_height - 1) / 2) as isize;

    for i in 0..res_width {
        for j in 0..res_height {
            // The direction of the ray denoted by m.
            // The origin is the camera position.
            let m = Vector {
                dx: vp.pixel_size * ((i - i_center) as f64),
                dy: vp.pixel_size * ((j - j_center) as f64),
                dz: 1.0,
            }.yaw(cam.yaw).pitch(cam.pitch);

            // ...
        }
    }

    // ...
}
Triangle Intersections
Now that we’re able to calculate the initial rays of light being projected out from the camera, how can we tell if one of these rays will hit a triangle?
First, we need to figure out where the ray intersects the plane that
the triangle lies on. Let’s define a plane struct.
Recall from geometry that a plane in 3D space is basically the
set of all coordinates that satisfy the equation
Ax + By + Cz + K = 0, where <x,y,z> is a coordinate:
struct Plane {
    a: f64,
    b: f64,
    c: f64,
    k: f64,
}
We must also consider the nature of the rays we defined
above. We have m, the direction of the ray,
an origin point s (which we implicitly define as the
camera’s origin point), and λ, a factor of how far from the
origin we are. Thus we arrive at the equation P = λm + s,
where P := <x,y,z> is any point that satisfies a point on the ray.
We additionally
require that λ > 0, otherwise the ray would include points
behind its origin.
Now we can solve the system of equations for the plane and the ray,
giving us λ = -(<A,B,C>⋅s + k) / (<A,B,C>⋅m) for our
intersection point.
Finally, with λm + s, we calculate the exact coordinates of our intersection. In Rust, this is implemented as:
impl Plane {
    /// Give the vector perpendicular to this plane
    #[inline]
    fn normal(&self) -> Vector {
        let (a,b,c,_k) = (self.a, self.b, self.c, self.k);
        Vector::new(a,b,c)
    }

    /// Return the intersection between this plane and a ray,
    /// defined by an origin and a direction vector.
    /// Also return whether the intersection occurs behind the origin.
    #[inline]
    fn intersection(&self, origin: Vector, direction: Vector) -> (Vector, bool) {
        // deconstruct plane
        let (_a,_b,_c,k) = (self.a, self.b, self.c, self.k);
        let normal_vect = self.normal();
        let lambda =
            -(normal_vect.dot_product(origin) + k)
            / normal_vect.dot_product(direction);
        (direction.scale(lambda) + origin, lambda > 0.0)
    }
}
Now back to our ray tracing loop. We define a closure for extracting
intersection info between an input plane p and a given ray
projected from the camera.
for i in 0..res_width {
    for j in 0..res_height {
        let m = Vector {
            dx: vp.pixel_size * ((i - i_center) as f64),
            dy: vp.pixel_size * ((j - j_center) as f64),
            dz: 1.0,
        }.yaw(cam.yaw).pitch(cam.pitch);

        // new
        let get_intersection = |p: &Plane| p.intersection(cam.pos, m);

        // ...
    }
}
Now we can define a helper function that will get the index of the closest triangle to be intersected, if any.
First we have to update Scene to include new information:
we precalculate the planes that each triangle lies in, to save
computation time for each of the rays.
struct Scene {
    camera: Camera,
    triangles: Vec<Triangle>,

    // new
    triangle_planes: Vec<Plane>,
}

impl Scene {
    // updated
    fn new(triangles: Vec<Triangle>) -> Scene {
        // Find the corresponding plane for every triangle
        let triangle_planes: Vec<Plane> = triangles
            .iter()
            .map(|t| t.plane())
            .collect();

        Scene {
            camera: Camera::new(),
            triangles,
            triangle_planes,
        }
    }
}
We additionally define a new method on Triangle
to calculate the plane on which it lies.
impl Triangle {
    /// Give the plane that the triangle intersects.
    fn plane(&self) -> Plane {
        // Calculate normal vector from cross product of two sides
        let cp = {
            let v1 = self.v1 - self.v2;
            let v2 = self.v1 - self.v3;
            v1.cross_product(v2)
        }.normalized();

        // calculate offset
        Plane {
            a: cp.dx,
            b: cp.dy,
            c: cp.dz,
            k: -cp.dot_product(self.v1),
        }
    }
}
Now for the helper function. Let’s implement it functionally, with map/reduce-like syntax.
impl Scene {
    /// Find the index of closest triangle that intersects a ray,
    /// and the associated intersection point.
    #[inline]
    fn closest_triangle_index(
        &self, get_intersection: &dyn Fn(&Plane) -> (Vector, bool)
        ) -> Option<(usize, Vector)> {

        // define functions to be applied on our stream

        let (index, dist, intersect) = self.triangle_planes.iter().enumerate()
            .map(intersect_map)
            .map(dist_from_camera)
            .fold((usize::MAX, f64::INFINITY, Vector::zero()), min_dist);

        if dist != f64::INFINITY {
            Some((index, intersect))
        } else {
            None
        }
    }
}
The process is simple:
- We take every plane associated with the triangles and list their indices
- We map them into their intersection point and index
- We additionally calculate distance from the camera origin
- If the intersection point doesn’t exist, we return
f64::INFINITYas the distance
- If the intersection point doesn’t exist, we return
- We reduce the stream to the closest intersection point; if it’s infinity
we return
None.
The code requires us to define three additional closures that can be mapped onto our functional stream.
They are as follows:
// return index and intersection point
let intersect_map = |(index, plane)| -> (usize, Vector) {
    (index, get_intersection(plane).0)
};

// return index, distance, intersection point
let dist_from_camera = |(index, intersect): (usize, Vector)| {
    let t = &self.triangles[index];
    if intersect.slow_intersect_check(t) {
        let cam_to_triangle = intersect - self.camera.pos;
        (index, cam_to_triangle.squared_magnitude(), intersect)
    } else {
        (0, f64::INFINITY, intersect)
    }

};

// return input with smaller distance
let min_dist = |tuple1: (usize, f64, Vector), tuple2: (usize, f64, Vector)| {
    if tuple1.1 < tuple2.1 {
        tuple1
    } else {
        tuple2
    }
};
Note that we use distance to flag null intersections. Thus,
dist_from_camera is also responsible for detecting an
intersection with a triangle. We do this with an as yet
undefined method on Vector: slow_intersect_check.
This function is named as such due to its speed; it’s
quite slow and inefficient to perform in bulk, and in
later parts we will explore how to optimize it.
But for now, let’s implement it.
impl Vector {
    /// Return true if p1 and p2 are both on the same side of the vector v1 -> v2.
    #[inline]
    fn same_side(p1: Vector, p2: Vector, v1: Vector, v2: Vector) -> bool {
        let v = v2 - v1;
        let a = v.cross_product(p1 - v2);
        let b = v.cross_product(p2 - v2);
        a.dot_product(b) > 0.0
    }

    /// Determine if a vector is bounded within a triangle t.
    /// Note: This function is relatively slow; use bounding boxes
    /// for a fast intial intersection check.
    #[inline]
    fn slow_intersect_check(&self, t: &Triangle) -> bool {
        Vector::same_side(*self, t.v1, t.v2, t.v3)
        && Vector::same_side(*self, t.v2, t.v1, t.v3)
        && Vector::same_side(*self, t.v3, t.v1, t.v2)
    }
}
With this, we verify that an intersection point lies on the same side of a triangle’s side as the triangle’s third vertex. By verifying that a point lies on the same side for all three sides, we essentially confirm that the point lies somewhere inside the triangle. If we assume that the point is already an intersection with the triangle’s plane, we know that we’ve found a point directly on the triangle!
We finally can add our triangle
intersection detector to iterate_over_rays:
const DEFAULT_LIGHT_COLOR: Color = Color::new(255, 255, 255);
const DEFAULT_BACKGROUND_COLOR: Color = Color::new(25, 25, 25);

fn iterate_over_rays(&self) -> Vec<Color> {
    // define useful variables

    let mut pixel_colors = Vec::with_capacity(res_height*res_width);

    for i in 0..res_width {
        for j in 0..res_height {
            // define the intersection detection closure

            let index_option = self.closest_triangle_index(&get_intersection);

            let color = match index_option {
                // expand for shadow calculations
                Some(_) => DEFAULT_LIGHT_COLOR,
                None => DEFAULT_BACKGROUND_COLOR,
            };

            pixel_colors.push(color);
        }
    }
    pixel_colors
}
We update our main function accordingly to reflect
our ray tracing method.
fn main() {
    // initialize scene

    let pixels = scene.iterate_over_rays();

    // ...
}
Huzzah! We now have a super basic ray tracer!
Conclusion
Well that was a long read, and we’ve barely gotten started! We managed to build an algorithm that can project rays from the camera and detect if those rays intersect a triangle in our scene. We additionally laid some groundwork for some more advanced rendering. But for now, the image that our program will attempt to render has only two colors, one for an object, and one for empty space. Not much to write home about!
Stay tuned, for in the next part we’ll learn how to render
our output as .ppm files, and use some nifty utilities
to convert them into familiar formats that we know and love,
such as .pngs or .jpgs!
Additionally, we will learn how to calculate lighting and (gasp) even shadows! And we will also cover some basic algorithmic optimizations that will greatly speed up our algorithm’s speed. In the end, we’ll use the power of Rust’s compile-time safety guarantees to create possibly the easiest parallel ray tracing program you’ve ever seen!